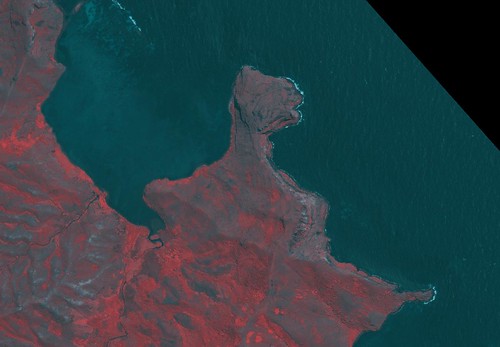
Rapa Iti - NE Coast GeoTIFF Image False Color (1:10,000)
I have been working on a redo of Rapa Iti Island, using an exquisite, cloud-free GeoTIFF image, for the past month, an "on-again, off-again" project. I have completed the island's revised shorelines taking them from EVS precision to EEVS precision. That is from Enhanced Vector Shorelines using Landsat ETM+ base imagery to Extremely Enhanced Vector Shorelines using 1-meter resolution base imagery. The "zooming" capabilities of EEVS are pretty amazing. If you map it, one could zoom in to view your backyard which is in need of mowing.
Anyway, the revised Rapa Iti shoreline is finished. I still have a variety of vegetation layers to digitize, along with human ground signatures (dwellings, roads, paths, harbor features, etc). Before I tackled these challenging layers I thought I would quickly generate topographic contours. Using Global Mapper's "Generate Contours" routine, one merely needs to import the appropriate SRTM image for your area of interest, select a few options and one has contours generated in seconds. These contours, when SRTM is accurate and complete (no voids), accurately reflect the elevations of your target area. But, SRTM tiles often have little voids, which can be quickly filled using software tools (my personal favorite is SRTMFill) and in certain areas, big voids, which are difficult to reliably fill. After much thought, research and counting my money (I hate to spend money on pricey software), I decided to use a tried-and-true method "eye-ball-it". Any cartographer worth their salt cringes at this method. Too often, unscrupulous map-makers foist their finished product off as a rigorously crafted map following standard cartograph protocols, when, in fact, the map is more fiction than fact - none of which speaks kindly of the "eye-balling" method. However, since I do not have the means to obtain surveyed contour lines or modified SRTM data of my target island, I'll just "eye-ball" this portion of the project. This involves looking at the underlying land features and comparing them to accurate, reliable contours, guess-timating possible alignment of the various misaligned contour tracks (i.e., 20-meters, 40-meters, etc) and finally realigning them.
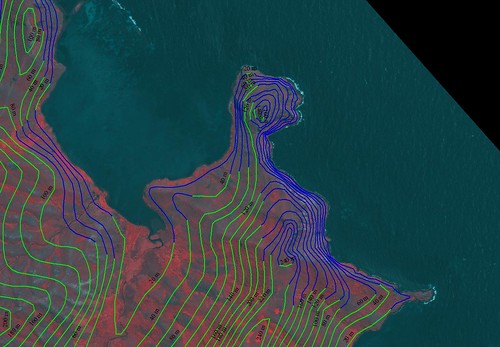
Rapa Iti - NE Coast Misaligned Contours Realigned (1:10,000)
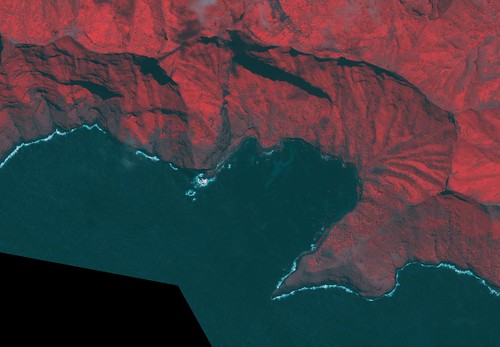
Let's begin with Maputu Pt or the NE Coast of Rapa. Because the SRTM data was incomplete, containing a large void (no data or incomplete data), this point had contours that were spilling into the ocean.
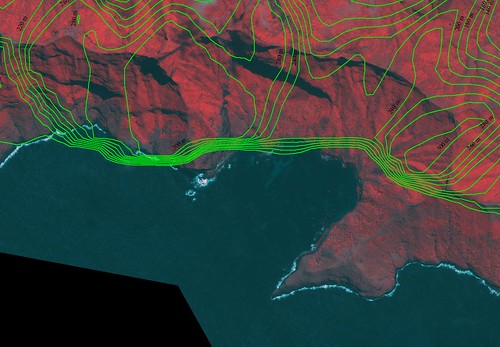
Rapa Iti - NE Coast SRTM Base Image Misaligned Contours Realigned (1:10,000)
The above image shows the SRTM limits as a darker shade of green, when, in fact, the actual shoreline is west of the SRTM shoreline. Using the GeoTIFF image, I was able to realign the misaligned contours (see the blue contours). The method I used is "eye-balling". I looked at the shape of the easterm side of the point and beginning with the highest elevation, I realigned each contour level. The eastern side of Maputu Point appears to be quite steep, based on the GeoTIFF image and my contour realignments.
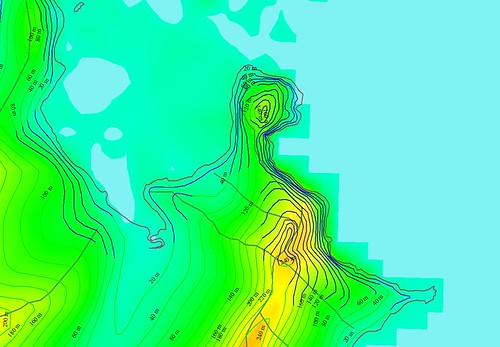
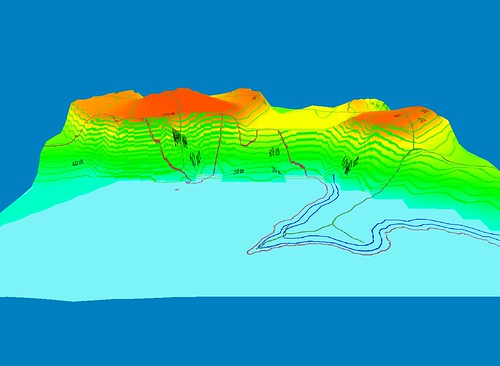
Rapa Iti - NE Coast EEVS Map with Realigned Contours Draped over SRTM Image using GM's 3D Effect (1:10,000)
Using Global Mapper's 3D Effect, I was able to see my work in a different, more revealing way. I think my "eye-balling" of the misaligned contours works quite well.
Rapa Iti - NE Coast GeoTIFF Image False Color (1:10,000)
From my GeoTIFF image to . . .
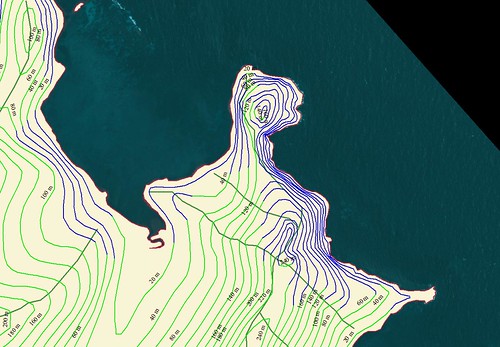
Rapa Iti - NE Coast EEVS Map Misaligned Contours Realigned (1:10,000)
Rapa Island, Maputu Point using EEVS precision (hi-res imagery). The green contours are generated from SRTM data. The blue contours are my realigned contours. They track the elevations more accurately then the SRTM based contours.
Rapa Iti - S Coast GeoTIFF Image False Color (1:10,000)
Rapa Iti - S Coast Misaligned Contours (1:10,000)
Along with the misaligned contours in the NE, another area of misaligned contours is along the southern shore. Looking at the GeoTIFF image without contours, one sees a coastline fronted by some pretty steep south facing slopes. Looking at the contours generated from the SRTM data, it is very easy to locate the problem contours. The steep slope is either poorly defined or nondefined by contours. Based on SRTM data, it appears the immediate shoreline is a very steep cliff fronting the shore. The contours do nothing toward resolving the remainder of the slope. Also the point that extends out is not defined.
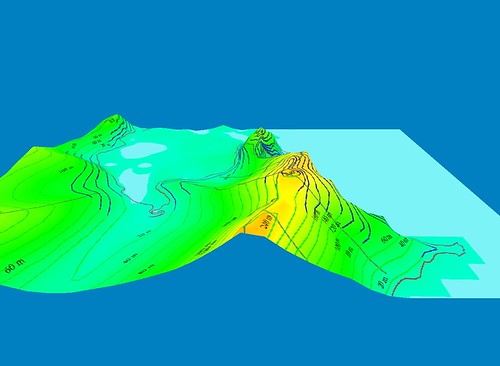
Rapa Iti - S Coast EEVS Map Misaligned Contours Draped over SRTM Image with 3D Effect (1:10,000)
Looking at the contours draped over the SRTM image the reason for the misalignment is obvious. Where there should be elevation data there is none.
So I will carefully "eye-ball" the slope and assigned contours where I guess-timate they belong. You know and I know these realigned contours are nothing more than educated guesses. In the case of this map of Rapa and in consideration of the quality of the base GeoTIFF imagery, the educated guesses will ultimately lead to a good map that is useful to gather an understanding of the topography of this island. If I were to have actual contours that could be applied to this map, I could produce a high quality product useful for a wide variety of purposes. As it is, my map containing "eye-balled" contours will be a quality product useful for a variety of purposes.
Stay tuned. This project should be finished within the next few weeks. Then, you be the judge.
Enjoy!
No comments:
Post a Comment